Update pfsense on the command line
Updates to most firewalls can be done through the web console (GUI). This is ok in most cases if you have to update one or two pfsense firewalls. If you have the need to update several firewalls it may be more convenient to start the update process using the command line. In this short tutorial I’ll teach you how to update a pfsense using the shell aka command line.

All output has been recorded on a pfsense 2.4.4. The output show the update from pfsense version 2.4.4_2 to 2.4.4_3. . Nonetheless this procedure to upgrade a pfsense will also work on version 2.5.x and 2.4.x or earlier.
Login to your pfsense box using ssh:
ssh root@mypfsense.mydomain.tld
You should see the welcome message like shown below. Press “8” to access the shell of pfsense.
pfSense - Netgate Device ID: obfuscated
*** Welcome to pfSense 2.4.4-RELEASE-p2 (amd64) on mypfsense ***

 WAN (wan)       -> em0        -> v4: yyy.xxx.xxx.xxx/29

 LAN (lan)       -> em1.1      -> v4: 10.xx.xx.254/22

 PFSYNC (opt1)   -> em1.110    -> v4: 10.xx.xx.1/24

 DMZ (opt2)      -> em2        -> v4: yyy.xxx.xxx.xxx/26

 0) Logout (SSH only)                  9) pfTop

 1) Assign Interfaces                 10) Filter Logs

 2) Set interface(s) IP address       11) Restart webConfigurator

 3) Reset webConfigurator password    12) PHP shell + pfSense tools

 4) Reset to factory defaults         13) Update from console

 5) Reboot system                     14) Disable Secure Shell (sshd)

 6) Halt system                       15) Restore recent configuration

 7) Ping host                         16) Restart PHP-FPM

 8) Shell

Enter an option: 8
The command we are looking for is simply “pfSense-upgrade”. Type “pfSense-upgrade –help” to get all command options for pfSense-upgrade.
[2.4.4-RELEASE][root@mypfsense.mydomain.tld]/root: pfSense-upgrade -h
Usage: pfSense-upgrade [-46bdfhnRUy] [-l logfile] [-p socket] [-c|-u|[-i|-d] pkg_name]

        -4          - Force IPv4

        -6          - Force IPv6

        -b          - Platform is booting

        -d          - Turn on debug

        -f          - Force package installation

        -h          - Show this usage help

        -l logfile  - Logfile path (defaults to /cf/conf/upgrade_log.txt)

        -n          - Dry run

        -p socket   - Write pkg progress to socket

        -R          - Do not reboot (this can be dangerous)

        -U          - Do not update repository information

        -y          - Assume yes as the answer to any possible interaction


The following parameters are mutually exclusive:

        -c          - Check if upgrade is necessary

        -i pkg_name - Install package PKG_NAME

        -r pkg_name - Remove package PKG_NAME

        -u          - Update repository information
In order to update pfsense you’ll simply type: “pfSense-upgrade -d”
Hint: Please note the capital “S” in pfSense-upgrade. (third letter)
[2.4.4-RELEASE][root@mypfsense.mydomain.tld]/root: pfSense-upgrade -d

>>> Updating repositories metadata...

Updating pfSense-core repository catalogue...

pfSense-core repository is up to date.

Updating pfSense repository catalogue...

pfSense repository is up to date.

All repositories are up to date.


The following 26 package(s) will be affected (of 0 checked):

New packages to be INSTALLED:

        pcre2: 10.21_1 [pfSense]

        libmspack: 0.5 [pfSense]


Installed packages to be UPGRADED:

        wpa_supplicant: 2.6_2 -> 2.8 [pfSense]

        unbound: 1.8.1 -> 1.9.1 [pfSense]

        suricata: 4.1.2_1 -> 4.1.4_2 [pfSense]

        sshguard: 2.2.0_4 -> 2.3.1 [pfSense]

        sqlite3: 3.24.0_1 -> 3.28.0 [pfSense]

        python27: 2.7.15 -> 2.7.16 [pfSense]

        py27-yaml: 3.12 -> 5.1 [pfSense]

        pfSense-rc: 2.4.4_2 -> 2.4.4_3 [pfSense-core]

        pfSense-pkg-suricata: 4.1.2_3 -> 4.1.4_5 [pfSense]

        pfSense-pkg-squid: 0.4.44_7 -> 0.4.44_8 [pfSense]

        pfSense-kernel-pfSense: 2.4.4_2 -> 2.4.4_3 [pfSense-core]

        pfSense-default-config: 2.4.4_2 -> 2.4.4_3 [pfSense-core]

        pfSense-base: 2.4.4_2 -> 2.4.4_3 [pfSense-core]

        pfSense-Status_Monitoring: 1.7.7 -> 1.7.10 [pfSense]

        pfSense: 2.4.4_2 -> 2.4.4_3 [pfSense]

        ntp: 4.2.8p12 -> 4.2.8p13 [pfSense]

        nginx: 1.14.0_6,2 -> 1.14.1,2 [pfSense]

        libzmq4: 4.2.3 -> 4.3.1 [pfSense]

        hostapd: 2.6_2 -> 2.8 [pfSense]

        dhcpleases: 0.3_1 -> 0.3_2 [pfSense]

        devcpu-data: 1.19 -> 1.22 [pfSense]

        curl: 7.62.0 -> 7.64.0 [pfSense]

        clamav: 0.100.2_1 -> 0.101.2,1 [pfSense]

        c-icap-modules: 0.5.2 -> 0.5.3_1 [pfSense]


Number of packages to be installed: 2

Number of packages to be upgraded: 24


The process will require 10 MiB more space.

75 MiB to be downloaded.


**** WARNING ****

Reboot will be required!!

Proceed with upgrade? (y/N) y

>>> Removing vital flag from lang/php72...

>>> Downloading upgrade packages...

Updating pfSense-core repository catalogue...

pfSense-core repository is up to date.

Updating pfSense repository catalogue...

pfSense repository is up to date.

All repositories are up to date.

Checking for upgrades (24 candidates): .......... done

Processing candidates (24 candidates): .......... done

The following 26 package(s) will be affected (of 0 checked):


New packages to be INSTALLED:

        pcre2: 10.21_1 [pfSense]

        libmspack: 0.5 [pfSense]


Installed packages to be UPGRADED:

        wpa_supplicant: 2.6_2 -> 2.8 [pfSense]

        unbound: 1.8.1 -> 1.9.1 [pfSense]

        suricata: 4.1.2_1 -> 4.1.4_2 [pfSense]

        sshguard: 2.2.0_4 -> 2.3.1 [pfSense]

        sqlite3: 3.24.0_1 -> 3.28.0 [pfSense]

        python27: 2.7.15 -> 2.7.16 [pfSense]

        py27-yaml: 3.12 -> 5.1 [pfSense]

        pfSense-rc: 2.4.4_2 -> 2.4.4_3 [pfSense-core]

        pfSense-pkg-suricata: 4.1.2_3 -> 4.1.4_5 [pfSense]

        pfSense-pkg-squid: 0.4.44_7 -> 0.4.44_8 [pfSense]

        pfSense-kernel-pfSense: 2.4.4_2 -> 2.4.4_3 [pfSense-core]

        pfSense-default-config: 2.4.4_2 -> 2.4.4_3 [pfSense-core]

        pfSense-base: 2.4.4_2 -> 2.4.4_3 [pfSense-core]

        pfSense-Status_Monitoring: 1.7.7 -> 1.7.10 [pfSense]

        pfSense: 2.4.4_2 -> 2.4.4_3 [pfSense]

        ntp: 4.2.8p12 -> 4.2.8p13 [pfSense]

        nginx: 1.14.0_6,2 -> 1.14.1,2 [pfSense]

        libzmq4: 4.2.3 -> 4.3.1 [pfSense]

        hostapd: 2.6_2 -> 2.8 [pfSense]

        dhcpleases: 0.3_1 -> 0.3_2 [pfSense]

        devcpu-data: 1.19 -> 1.22 [pfSense]

        curl: 7.62.0 -> 7.64.0 [pfSense]

        clamav: 0.100.2_1 -> 0.101.2,1 [pfSense]

        c-icap-modules: 0.5.2 -> 0.5.3_1 [pfSense]


Number of packages to be installed: 2

Number of packages to be upgraded: 24


The process will require 10 MiB more space.

75 MiB to be downloaded.

[1/26] Fetching wpa_supplicant-2.8.txz: .......... done

[2/26] Fetching unbound-1.9.1.txz: .......... done

[3/26] Fetching suricata-4.1.4_2.txz: .......... done

[4/26] Fetching sshguard-2.3.1.txz: .......... done

[5/26] Fetching sqlite3-3.28.0.txz: .......... done

[6/26] Fetching python27-2.7.16.txz: .......... done

[7/26] Fetching py27-yaml-5.1.txz: .......... done

[8/26] Fetching pfSense-rc-2.4.4_3.txz: .. done

[9/26] Fetching pfSense-pkg-suricata-4.1.4_5.txz: .......... done

[10/26] Fetching pfSense-pkg-squid-0.4.44_8.txz: ........ done

[11/26] Fetching pfSense-kernel-pfSense-2.4.4_3.txz: .......... done

[12/26] Fetching pfSense-default-config-2.4.4_3.txz: . done

[13/26] Fetching pfSense-base-2.4.4_3.txz: .......... done

[14/26] Fetching pfSense-Status_Monitoring-1.7.10.txz: ... done

[15/26] Fetching pfSense-2.4.4_3.txz: . done

[16/26] Fetching ntp-4.2.8p13.txz: .......... done

[17/26] Fetching nginx-1.14.1,2.txz: .......... done

[18/26] Fetching libzmq4-4.3.1.txz: .......... done

[19/26] Fetching hostapd-2.8.txz: .......... done

[20/26] Fetching dhcpleases-0.3_2.txz: .. done

[21/26] Fetching devcpu-data-1.22.txz: .......... done

[22/26] Fetching curl-7.64.0.txz: .......... done

[23/26] Fetching clamav-0.101.2,1.txz: .......... done

[24/26] Fetching c-icap-modules-0.5.3_1.txz: .......... done

[25/26] Fetching pcre2-10.21_1.txz: .......... done

[26/26] Fetching libmspack-0.5.txz: .......... done

Checking integrity... done (0 conflicting)

>>> Upgrading pfSense-rc...

Checking integrity... done (0 conflicting)

The following 1 package(s) will be affected (of 0 checked):


Installed packages to be UPGRADED:

        pfSense-rc: 2.4.4_2 -> 2.4.4_3 [pfSense-core]


Number of packages to be upgraded: 1

[1/1] Upgrading pfSense-rc from 2.4.4_2 to 2.4.4_3...

[1/1] Extracting pfSense-rc-2.4.4_3: .... done

>>> Upgrading pfSense kernel...

Checking integrity... done (0 conflicting)

The following 1 package(s) will be affected (of 0 checked):


Installed packages to be UPGRADED:

        pfSense-kernel-pfSense: 2.4.4_2 -> 2.4.4_3 [pfSense-core]


Number of packages to be upgraded: 1

[1/1] Upgrading pfSense-kernel-pfSense from 2.4.4_2 to 2.4.4_3...

[1/1] Extracting pfSense-kernel-pfSense-2.4.4_3: .......... done

===> Keeping a copy of current kernel in /boot/kernel.old

>>> Removing unnecessary packages...

Checking integrity... done (0 conflicting)

Nothing to do.

Upgrade is complete.  Rebooting in 10 seconds.


Broadcast Message from root@mypfsense.mydomain.tld

        (/dev/pts/0) at 14:43 CEST...


Upgrade is complete.  Rebooting in 10 seconds.
The pfsense firewall now reboots and will be back online after 2-3 minutes. After that you can check the result by logging in again using ssh. Check if there are any missing updates or packages that need to be upgraded by using “pfsense-upgrade –c” . This will check for any missing packages or updates:
[2.4.4-RELEASE][root@mypfsense.mydomain.tld]/root: pfSense-upgrade -c

>>> Updating repositories metadata... done.

Your system is up to date
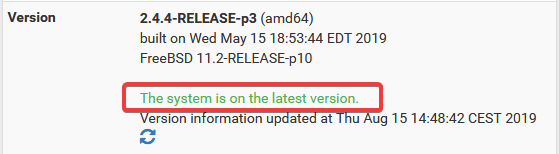
That’s it. Your pfSense firewall is now updated to the latest version and ready to use again. Your GUI should also credit the latest version of pfsense being installed. Have fun.
- About the Author
- Latest Posts

Matthias Böhmichen is the founder of howto-do.it . He is using Linux since 1991 and fell in love with windows a few years later. He likes to discover new technologies, especially hard- and software.