Mastering the Art: How to SSH into Raspberry Pi from Mac
In the depths of this informative piece, “Mastering the Art: How to SSH into Raspberry Pi from Mac,” we unearth the secrets of one of the most powerful connection methods available to developers and IT professionals. Documenting a detailed and succinct step-by-step guide, we answer the prevalent question of how one can securely remotely access a Raspberry Pi from a Mac using Secure Shell (SSH) protocol. This guide promises to empower readers with the technical know-how to harness the full potential of this game-changing technology.
Understanding the Basics
Before we dive deep into discussing how to SSH into Raspberry Pi from Mac, it’s essential that we cover the basic terms used in this process. Familiarity with these terms not only provides a clearer understanding of what we are doing but also enables us to troubleshoot effectively in case we encounter any issues.
Defining SSH
SSH, an acronym for Secure Shell, is a highly secure network protocol designed to allow encrypted communication over a network. It enables remote command execution, meaning that you can control another computer from your own, even if both machines are located far apart. This is what makes SSH particularly useful for managing servers or accessing your Raspberry Pi remotely.
What is Raspberry Pi?
Raspberry Pi is a series of small single-board computers developed primarily with the intention of teaching computer science in schools and developing countries. Despite its compact size and affordability, Raspberry Pi is a powerful, versatile tool capable of performing functions like a desktop PC, including tasks such as internet browsing, playing high-definition video, and many more.
Explanation of the role of Mac in this process
In the context of this guide, a Mac is the local computer from which we will be connecting to the Raspberry Pi using SSH. We chose Mac because it inherently supports SSH connections, thanks to its Unix-based operating system. Hence, we can establish an SSH connection to Raspberry Pi without needing to install additional software.
Raspberry Pi Setup
A successful SSH connection requires an adequately set-up Raspberry Pi. Here’s a step-by-step guide to prepare your Raspberry Pi for an SSH connection.
Step-by-step Raspberry Pi setup
First, ensure that your Raspberry Pi has a suitable operating system installed, mostly a variant of Linux. Install the necessary updates and set up the required peripherals such as monitor, keyboard, and mouse. Lastly, ensure that your Raspberry Pi is connected to the internet.
Enabling SSH on Raspberry Pi
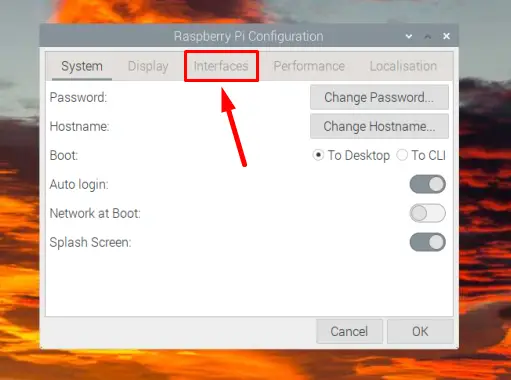
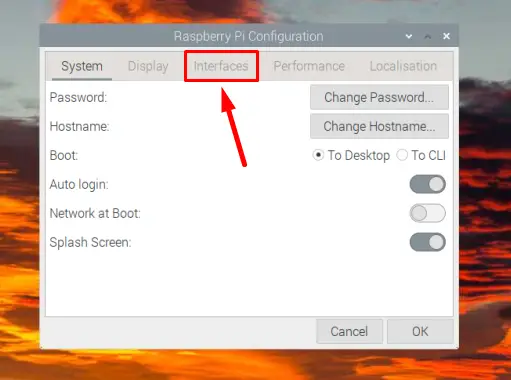
By default, the SSH feature on Raspberry Pi is not enabled. To enable SSH, go to the Raspberry Pi configuration menu, head to the interfaces tab and enable the SSH option.
Tips for successful Raspberry Pi setup
Ensure that your Raspberry Pi is updated with the latest software. Outdated software can lead to unnecessary complications and vulnerabilities. Also, confirm that your Raspberry Pi is correctly connected to peripherals and the internet before you start the SSH process.
This image is property of cdn-learn.adafruit.com.
Network Connectivity
Effective network connectivity is crucial for a successful SSH connection. Following are some procedures to ensure your Raspberry Pi’s effective network connectivity.
Ensuring Raspberry Pi’s connection to internet
To verify if your Raspberry Pi is connected to the internet, open a web browser and try to open any webpage. If you can’t access the internet, check your WiFi or ethernet connection.
Checking connectivity with ping command from Mac
From your Mac, use the ‘ping’ command followed by your Raspberry Pi’s IP address in the terminal to check connectivity. If everything is fine, you will start receiving replies from the Raspberry Pi’s IP address.
Troubleshooting common connectivity issues
Most common connectivity issues can be resolved by resetting your router or confirming that your network cables are correctly connected. If the issue persists, ensure your WiFi settings are proper, or your ethernet cable is operational.
Identifying Your Raspberry Pi’s IP Address
Your Raspberry Pi’s IP address serves as its identifier in your network. Here are some methods to find your Raspberry Pi’s IP address.
Methods to find Raspberry Pi’s IP address
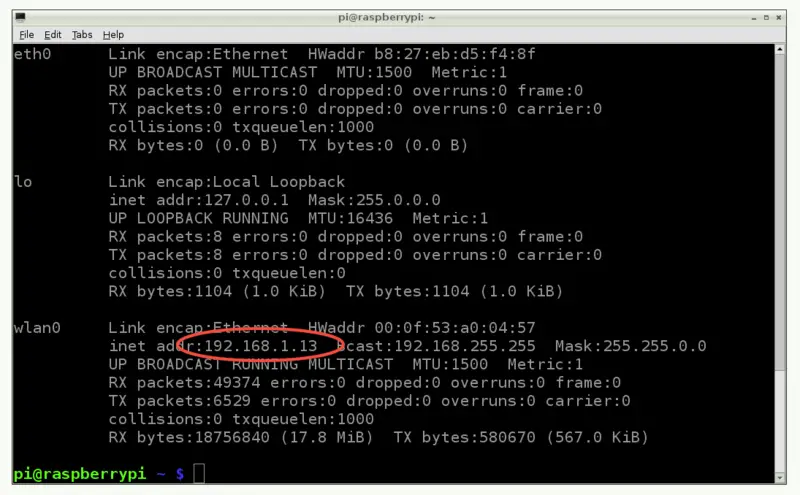
You can find your Raspberry Pi’s IP address by navigating to ‘Device List’ on your router’s configuration page. You can also use the ‘hostname -I’ command on your Raspberry Pi to display its IP address.
Using nmap on Mac
The ‘nmap’ command line on your Mac can also be used to scan your network and find your Raspberry Pi’s IP address. Run ‘nmap -sn 192.168.xx.0/24’, replacing ‘xx’ with your specific network details.
Understanding static and dynamic IP addresses
Your router assigns a dynamic IP address to your Raspberry Pi each time it connects to the network. This address can change over time. On the other hand, a static IP address remains the same and hence is more reliable for SSH connections.
This image is property of cdn-learn.adafruit.com.
SSH Client on Mac
A Mac has a built-in SSH client, so you don’t need to install any additional software.
Introduction to Terminal on Mac
Terminal on Mac is a command-line interface that allows you to interact directly with your operating system. It is through Terminal that we will establish our SSH connection.
Alternative SSH clients for Mac
While Terminal acts as the default SSH client on Mac, alternatives like iTerm or ZOC Terminal could be used as SSH clients too.
Setting up SSH client on Mac
Since Terminal is pre-installed, no additional setup is required. Simply search for Terminal in your applications to start using it.
Connecting to Raspberry Pi from Mac via SSH
Now that we have everything set up, we can connect to the Raspberry Pi from Mac via SSH.
Entering the correct command in Terminal
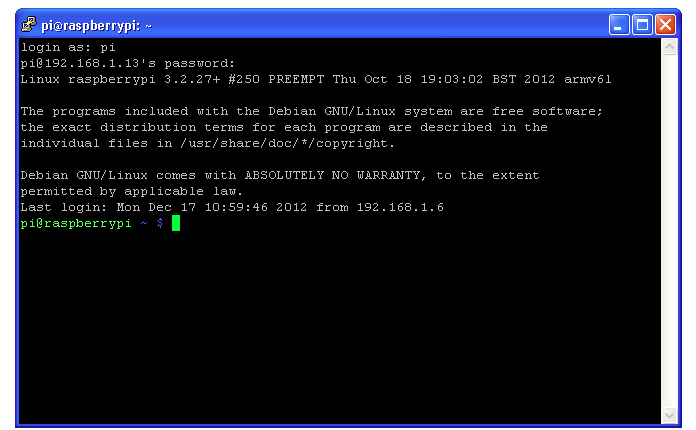
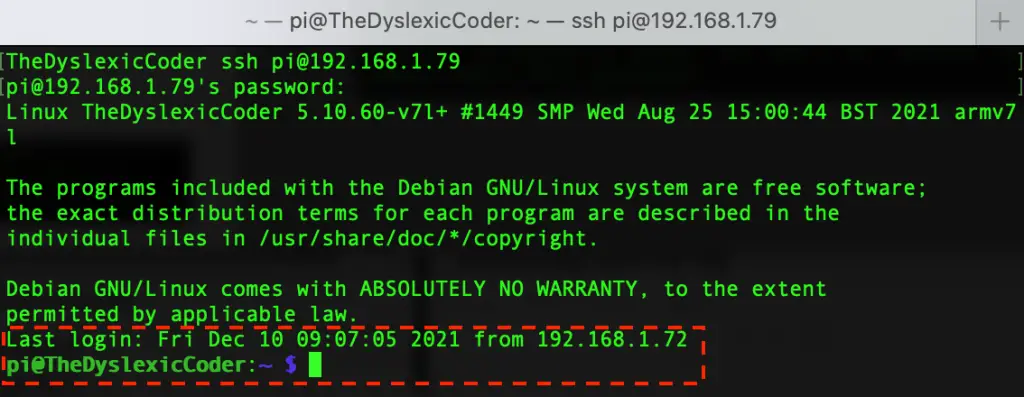
To initiate the SSH connection, open Terminal on your Mac, and type ‘ssh pi@xxx.xxx.x.x‘, replacing ‘xxx.xxx.x.x’ with your Pi’s IP address.
Issues you might encounter while connecting
Some common issues that you may encounter could include ‘Connection Refused’ or ‘Timeout’. These could be a sign that your Raspberry Pi is not set up correctly or is not reachable on the network.
Resolving common connection errors
Most common errors can be resolved by checking your network connection and ensuring that SSH is enabled on your Raspberry Pi. If issues persist, try troubleshooting with different commands or resetting your Raspberry Pi.
This image is property of miro.medium.com.
Entering Correct Usernames and Passwords
Credentials are critical when it comes to SSH connections. Here’s what you need to know.
Default Raspberry Pi credentials
By default, the username for your Raspberry Pi is ‘pi’, and the password is ‘raspberry’.
Creating new user and password on Raspberry Pi
You can create a new user and password on your Raspberry Pi for added security. This can be done using the ‘useradd’ and ‘passwd’ commands in Raspberry’s Linux system respectively.
Importance of secure credentials
Secure credentials are vital in preventing unauthorized access to your Raspberry Pi.
Maintaining Your SSH Connection
Once you establish your SSH connection, you need to ensure that it remains stable.
Ensuring a stable connection
A stable connection can be maintained by ensuring that both your Mac and Raspberry Pi are constantly connected to the internet.
Dealing with connection disruptions
In case of any disruption, first check your internet connectivity. If your internet connectivity is fine, then the issue might lie with your Raspberry Pi.
Automating reconnection
You can automate the reconnection process using a script that detects if your SSH connection is active and automatically reconnects if not.
This image is property of linuxhint.com.
Secure Practices in SSH Connections
Security cannot be compromised when dealing with SSH connections. Here’s everything you need to know about secure practices in SSH connections.
The importance of SSH keys
SSH keys provide a secure way of logging into a virtual private server with SSH than using a password alone. Hence, we highly recommend you use SSH keys.
How to use SSH keys for secure connection
On your Mac’s terminal, use the ‘ssh-keygen’ command. Then, place the created public key on your Raspberry Pi and use your private key on your Mac to connect securely with your Raspberry Pi.
Implementing VPN for additional security
If you desire an extra layer of security, you can choose to implement a VPN. It encrypts your online activity, making it more challenging for others to intercept or monitor your data.
Common Issues and Troubleshooting
While SSH connections are typically reliable, there are times when issues may arise. Here are some common issues and their possible solutions.
Resolving connectivity issues
Always start by confirming that your internet connection is stable. Then, ensure that SSH is properly enabled on your Raspberry Pi, and your Mac’s firewall isn’t blocking the SSH connection.
Dealing with incorrect credentials
In the event of incorrect credentials, make sure you’re entering the right username and password. Remember, both are case sensitive.
Overcoming common error messages in SSH
Common errors like “Connection Refused” or “Connection Timed Out” usually indicate a problem with your network or Raspberry Pi setup. In such situations, verifying your Raspberry Pi’s settings, your network’s status, and your Mac’s firewall settings would be a good starting point.
In conclusion, connecting to your Raspberry Pi from a Mac may seem intimidating initially. However, with a good understanding of the basics, proper setup, and secure practices, it’s a process you can master in no time. Remember patience is key to getting around any hurdles. Persistence, coupled with curiosity, holds the key to truly mastering the art of SSH into Raspberry Pi from Mac.
This image is property of linuxhint.com.
- About the Author
- Latest Posts
Mark is a senior content editor at Text-Center.com and has more than 20 years of experience with linux and windows operating systems. He also writes for Biteno.com
